PROTOTYPE
- Build the ORxPi image with adding required packages to support the LCD screen
- Run the sample script
PROTOTYPE
Need your help to solve the following issue. I have documented the implementation process and please post your comments regarding this issue and solutions to make the correct build.
Preparing the build box
Prerequisites
sudo apt-get install build-essential). This installssudo apt-get install util-linux)sudo apt-get install git-core)sudo apt-get install mercurial meld)sudo apt-get install libstdc++6)Also required for creating the SD card image:
sudo apt-get install e2fsprogs)sudo apt-get install dosfstools)sudo apt-get install parted)sudo apt-get install qemu)Following package should be installed for menu configuration
sudo apt-get install ncurses-dev
Cloning the repository
$ git clone –b develop --recursive https://github.com/Outernet-Project/orx-rpi.git
Including new packages:
Following packages should be included with the BR2_EXTERNAL.
smbus-cffi 0.5.1
Create a folder python-smbus inside the orx-rpi/rpi/package/
Create following two files inside python-smbus
Config.in
config BR2_PACKAGE_PYTHON_SMBUS
    bool "python-smbus"
    select BR2_PACKAGE_PYTHON_CFFI
    help
          This Python module allows SMBus access through the I2C /dev interface on Linux hosts. The host kernel must have I2C support, I2C device interface support, and a bus adapter driver.

      https://pypi.python.org/pypi/smbus-cffi/
python-smbus.mk
################################################################################
#
# python-smbus
#
################################################################################

PYTHON_SMBUS_VERSION = 0.5.1
PYTHON_SMBUS_SOURCE = smbus-cffi-$(PYTHON_SMBUS_VERSION).tar.gz
PYTHON_SMBUS_SITE = https://pypi.python.org/packages/source/s/smbus-cffi
PYTHON_SMBUS_SETUP_TYPE = setuptools
PYTHON_SMBUS_LICENSE = GPLv2+ or Python software foundation license v2
PYTHON_SMBUS_LICENSE_FILES = LICENSE.GPL LICENSE.PSF
PYTHON_SMBUS_CFFI_DEPENDENCIES = host-python-cffi

$(eval $(python-package))
RPi.GPIO 0.6.1
Create another folder rpi-gpio inside the orx-rpi/rpi/package/
Create following two files inside rpi-gpio
Config.in
config BR2_PACKAGE_RPI_GPIO
    bool "rpi-gpio"
    help
      A module to control Raspberry PI GPIO channels.

      http://sourceforge.net/projects/raspberry-gpio-python
rpi-gpio.mk
################################################################################
#
# rpi-gpio
#
################################################################################

RPI_GPIO_VERSION = 0.6.1
RPI_GPIO_SOURCE = RPi.GPIO-$(RPI_GPIO_VERSION).tar.gz
RPI_GPIO_SITE = http://pypi.python.org/packages/source/R/RPi.GPIO
RPI_GPIO_LICENSE = MIT
RPI_GPIO_LICENSE_FILES = LICENSE.txt
RPI_GPIO_SETUP_TYPE = distutils

$(eval $(python-package))
Open Config.in file inside the orx-rpi/rpi and add following two lines at the end of the file before endmenu. You can use gedit text editor to edit the file.
source "$BR2_EXTERNAL/package/python-smbus/Config.in"
source "$BR2_EXTERNAL/package/rpi-gpio/Config.in"
Now save and close the file.
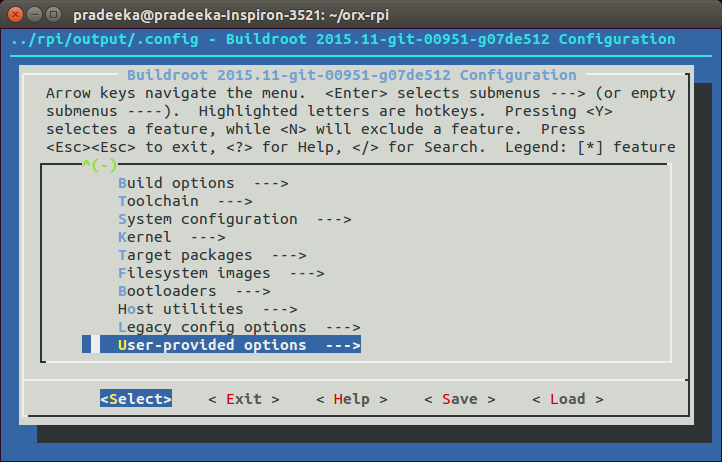
Menu configuration
Open a terminal and change the directory to orx-rpi.
cd orx-rpi
Run following command to make the menu configuration.
$make menuconfig
Following are the series of screens for menu configuration.
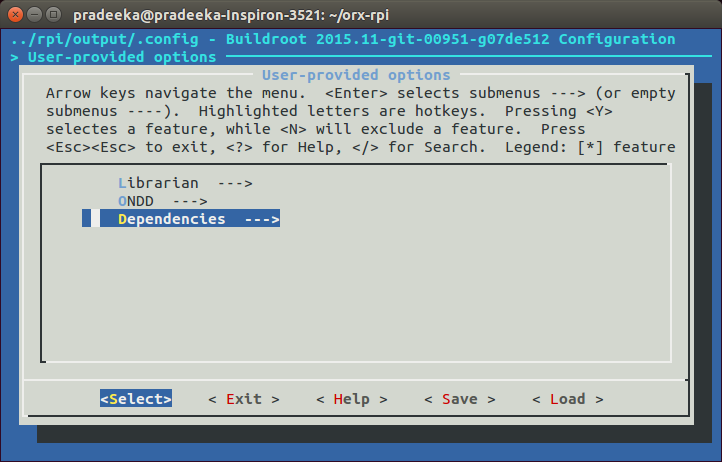
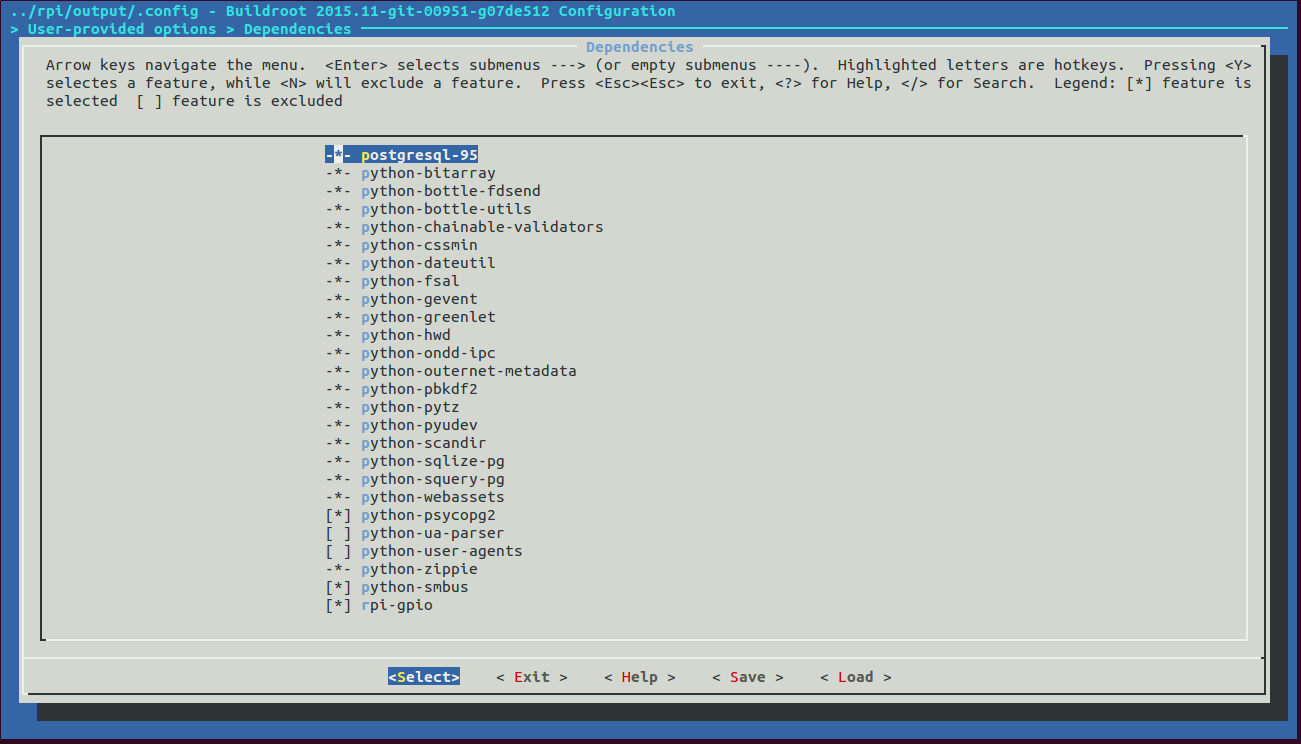
Select User-provided options
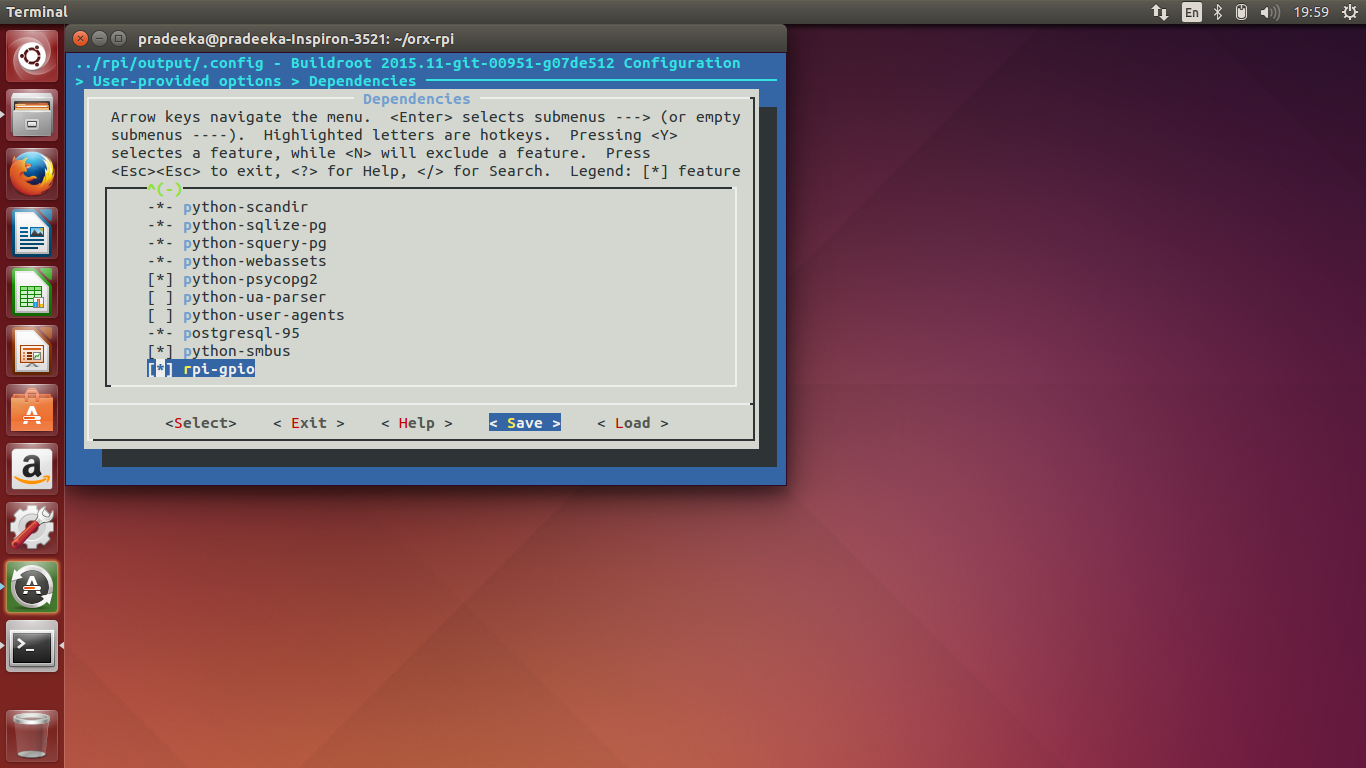
Select Dependencies
Press ‘Y’ to select python-smbus and rpi-gpio. Then select Save option.
Select OK
Select Exit
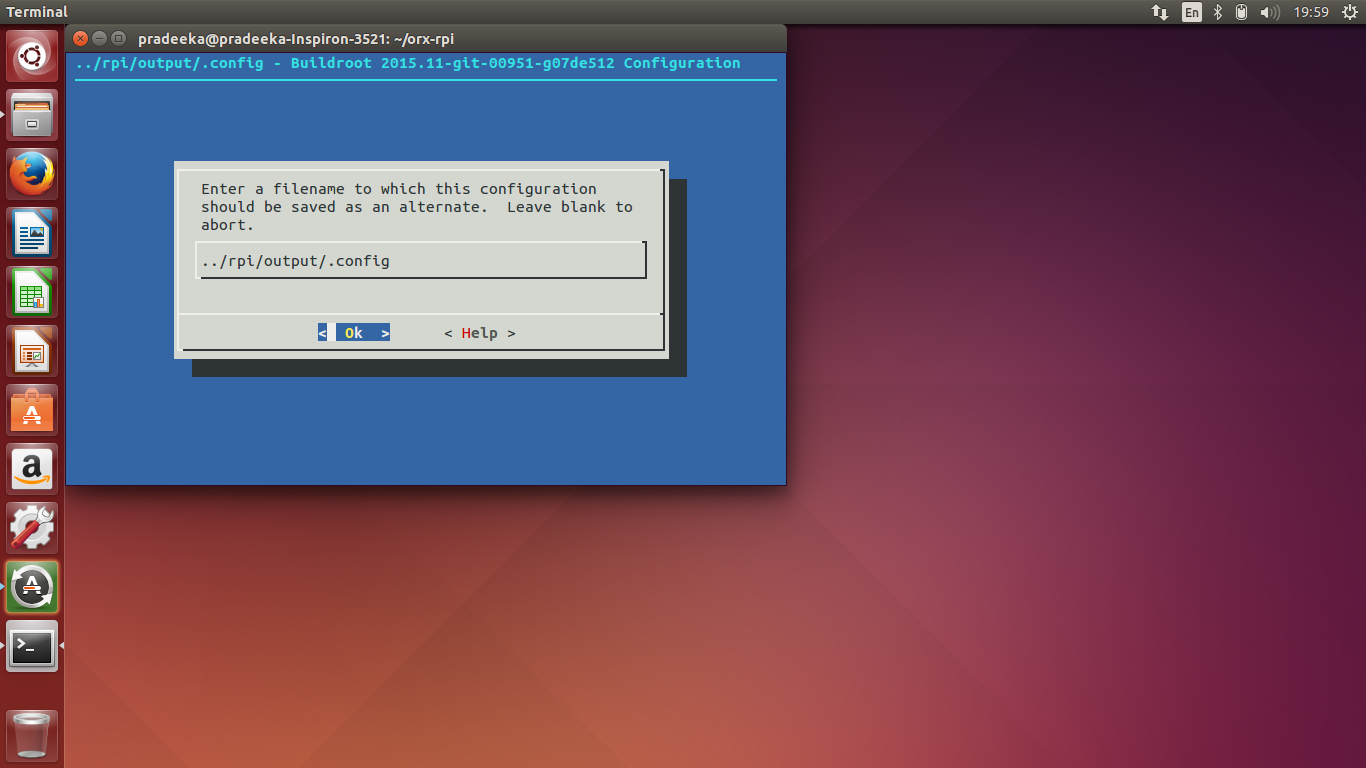
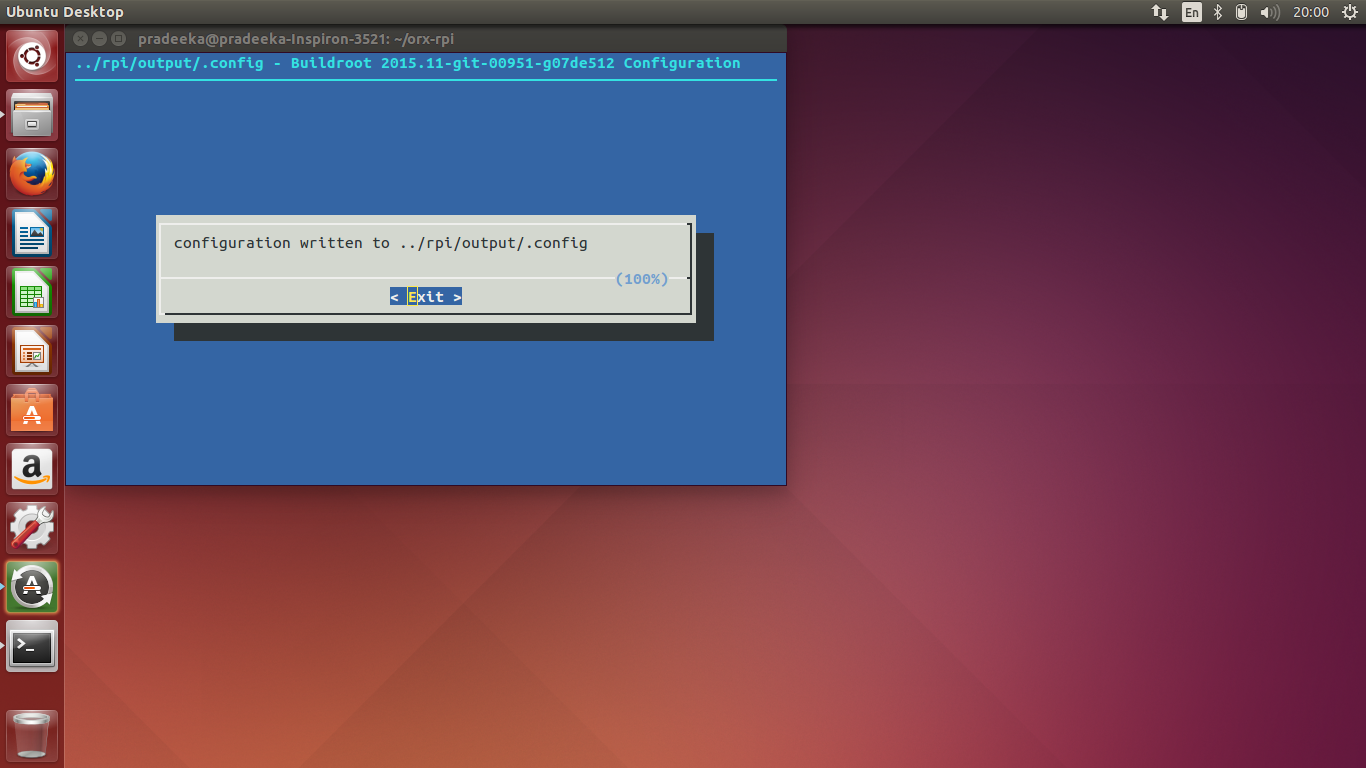
Finally run the following command to write the configuration in orx_defconfig file inside the directory orx/rpi/rpi/configs
$make savedefconfig
Build
To build the rootfs rub make with the target Raspberry Pi 2.
$make B=rpi2
Once build completes, you can build the image file.
$sudo make image
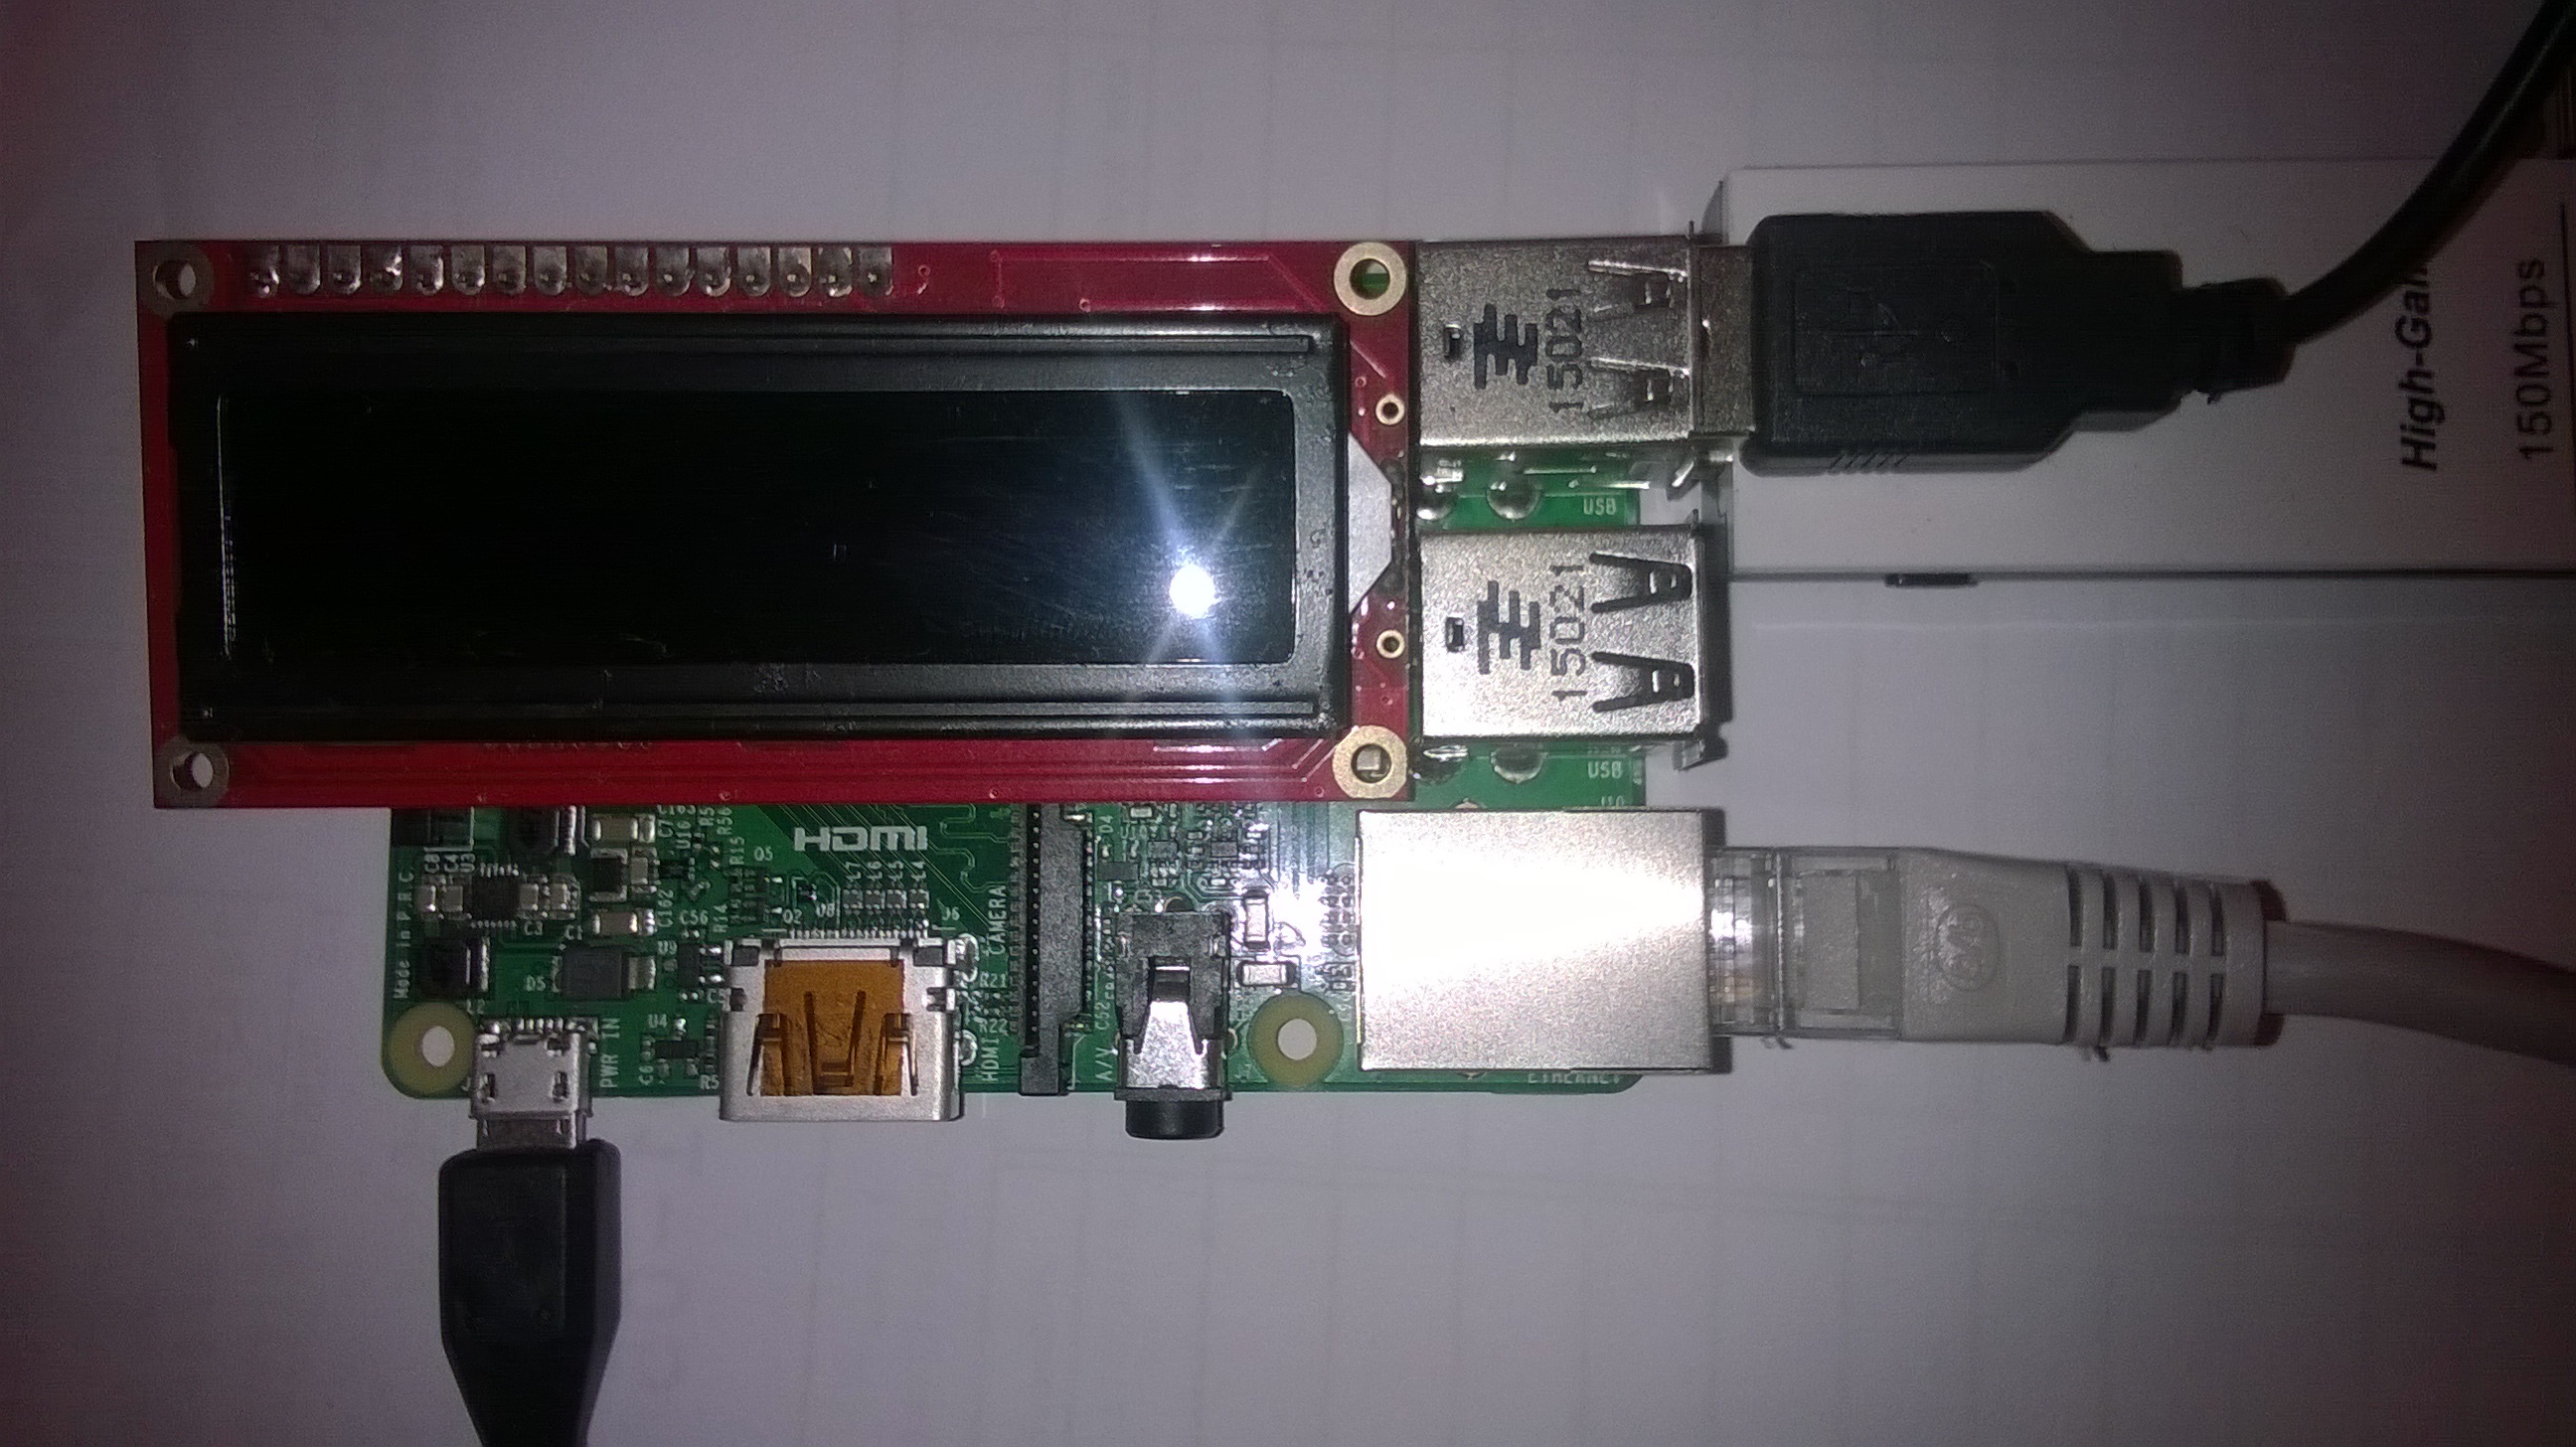
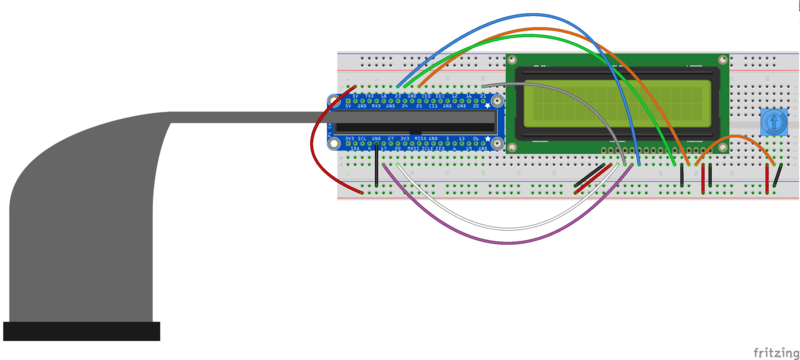
Circuit
Fritzing representation. - Image taken from Adafruit Industries
Schematic - Image taken from Adafruit Industries
How to run the test python script.
Using SSH log in to your ORxPi
Run following command from the prompt.
python lcd.py
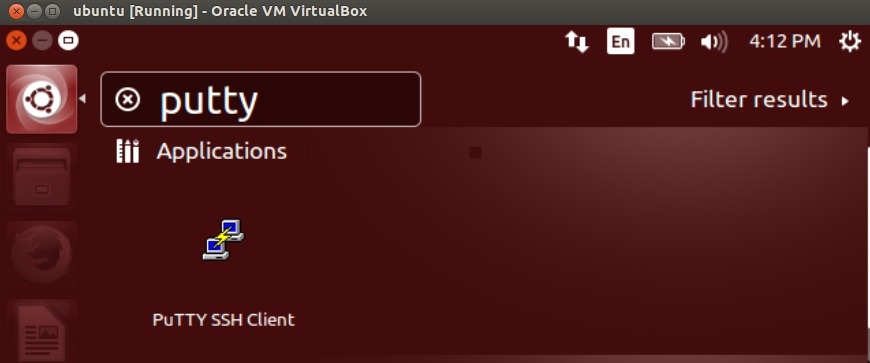
Connect with ORxPi using PuTTY SSH Client
First install PuTTY SSH Client on Ubuntu with following command.
sudo apt-get install putty
Now start PuTTY SSH Client.
Type the IP address of your ORxPi and click Open.
Transfer files with Ubuntu
I copied following two sample python scripts to test the newly installed packages. The Adafruit_CharLCD_IPclock_example.py will display the IP address assigned with the Raspberry Pi.
The sample code bundle can be found at GitHub - adafruit/Adafruit-Raspberry-Pi-Python-Code: Adafruit library code for Raspberry Pi
Using terminal run following commands.
pradeeka@pradeeka-Inspiron-3521:~$ scp /home/pradeeka/Downloads/lcd/Adafruit_CharLCD.py [email protected]:/home/outernet/
[email protected]'s password:
Adafruit_CharLCD.py                           100% 7725     7.5KB/s   00:00
pradeeka@pradeeka-Inspiron-3521:~$


pradeeka@pradeeka-Inspiron-3521:~$ scp /home/pradeeka/Downloads/lcd/Adafruit_CharLCD_IPclock_example.py [email protected]:/home/outernet/
[email protected]'s password:
Adafruit_CharLCD_IPclock_example.py                 100%  546     0.5KB/s   00:00
pradeeka@pradeeka-Inspiron-3521:~$
Now in PuTTY terminal run python script.
python Adafruit_CharLCD_IPclock_example.py
Unfortunately I got the following run time error and seems the compiler couldn’t found the RPi.GPIO library.
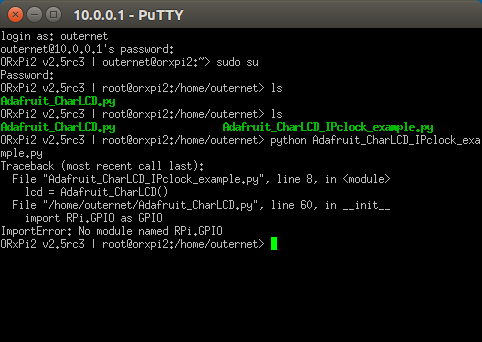
Please help to solve this issue.
Pradeeka,
If I understand well, you tried to rebuild the ORx with char LCD support, more exactly compile the kernel with the RPi GPIO package support.
It seems me, this process have some more stepps, I dont find in your documentation. But I havenot experiences with this rebuild process, I dont able to find the missing stepps here.
From your last erros message “ImportError: no module named RPi.GPIO” it seems me, your stepps wasnot successfull.
If you have the hardware ready to use, I propose first try to program it from a “standard” raspbian linux, and use an ethernet connection first.
I dont understand why you need to install on ubuntu the Putty util. You can use a simple ubuntu terminal access to the Raspberry, in the case of the raspbian, looks like:
ssh rpi@your_rpiip_address
and from raspbian promt you can use the wget util to download the Adafruit package
But before you run this Adafruit…example.py program, maybe you need to install the RPi python GPIO packages from the pypi collection.
To check if you have it or not try this:
$ sudo python
At python promt (>>>) write this: (whitout >>>, of course)
>>> import RPi.GPIO as GPIO
If it dont say error, it is installed the module.
If you have an error mesaage, follow this commands: (break the python running with ctrl-D)
$ wget http://pypi.python.org/packages/source/R/RPi.GPIO/RPi.GPIO-0.6.1.tar.gz
$ tar zxf RPi.GPIO-0.6.1.tar.gz
$ cd RPi.GPIO-0.6.1
$ sudo python setup.py install
after this try to run your Adafriut…example.py program again…
By the way, this topic is a little OFF here, maybe you will have more help on an RPi forum, somewhere, instead.
t.janos
Yes. I’m trying to build a new ORxPi image, including the RPi.GPIO package and python-smbus (see my documentation). I’m using BR2_EXTERNAL to include the packages.
yes. something is missing.
It works with Raspbian.
ImportError means your RPi.GPIO package did not install (if you created one).
This is the rpi-gpio.mk file.
################################################################################
#
# rpi-gpio
#
################################################################################

RPI_GPIO_VERSION = 0.6.1
RPI_GPIO_SOURCE = RPi.GPIO-$(RPI_GPIO_VERSION).tar.gz
RPI_GPIO_SITE = http://pypi.python.org/packages/source/R/RPi.GPIO
RPI_GPIO_LICENSE = MIT
RPI_GPIO_LICENSE_FILES = LICENSE.txt
RPI_GPIO_SETUP_TYPE = distutils

$(eval $(python-package))
and this is the Config.in file
config BR2_PACKAGE_RPI_GPIO
    bool "rpi-gpio"
    help
      A module to control Raspberry PI GPIO channels.

      http://sourceforge.net/projects/raspberry-gpio-python
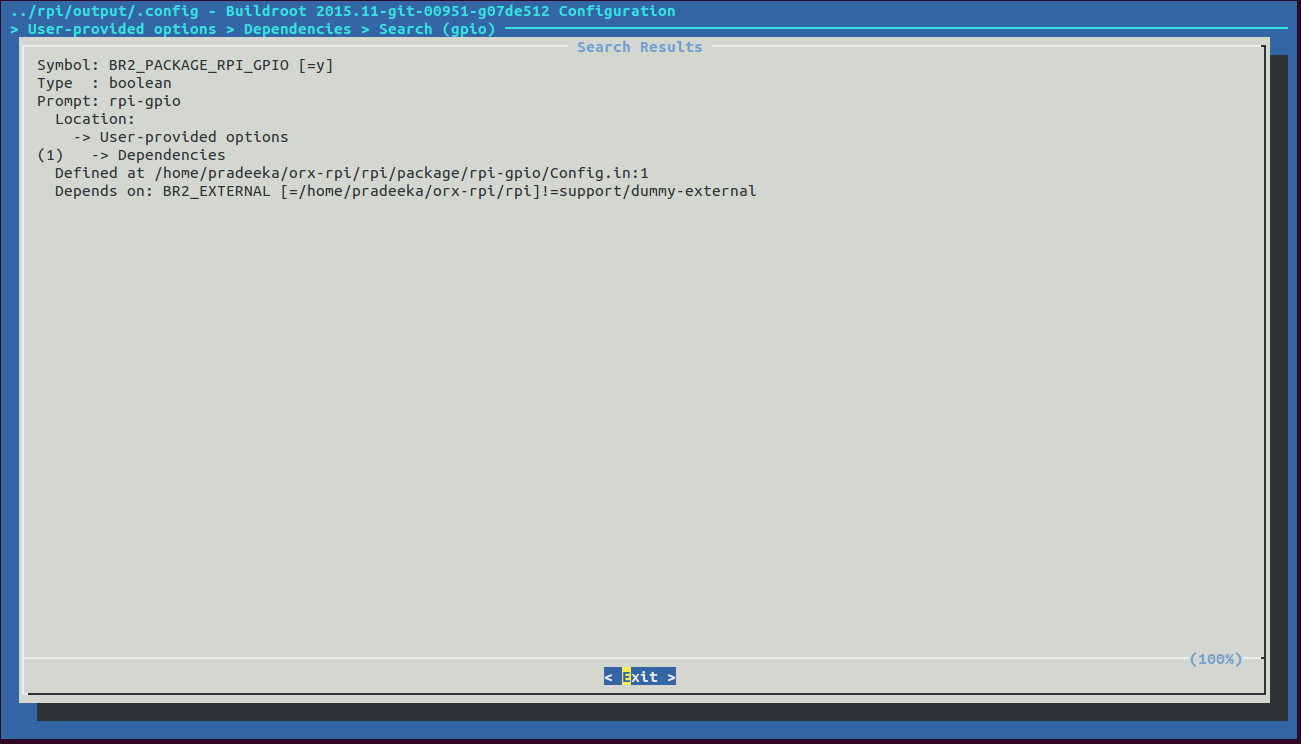
Is it added to rpi/Config.in as well, and is it enabled in the configuration menu?
How to update the cloned branch in my local drive to reflect with the up-to-date version in git hub?
In my local drive I have the develop branch, cloned about 5 days ago. I want to update it without deleting.
git pull should update your branch provided there are no conflicts (changes that exist both in your local clone and on GH).
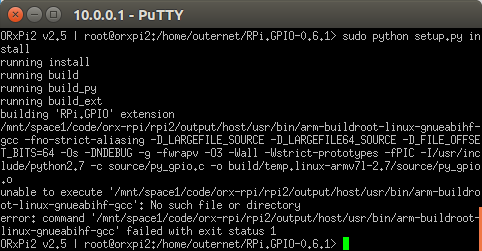
Also, you can try manually installing the package on the Pi by unpacking it and running
$ cd path/to/unpacked/package
$ sudo python setup.py installManual installation not works with ORxPi. I got following error.
Ah so it requires C extension. You should carefully reread the install instructions for that library and review your package files.
okay, sure
I can’t find any C extension required for rpi-gpio in the documentation.
However, yesterday I cloned a fresh copy from the develop branch and configured everything correctly.
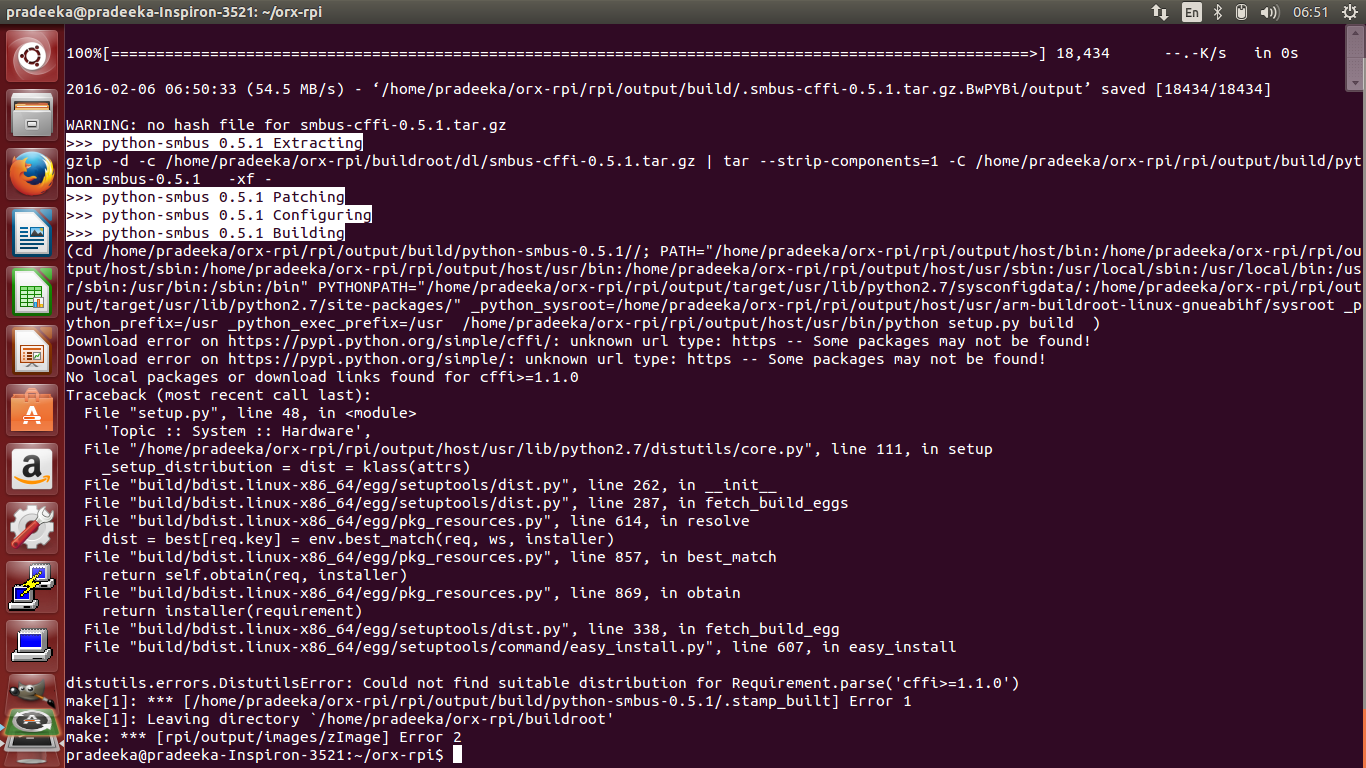
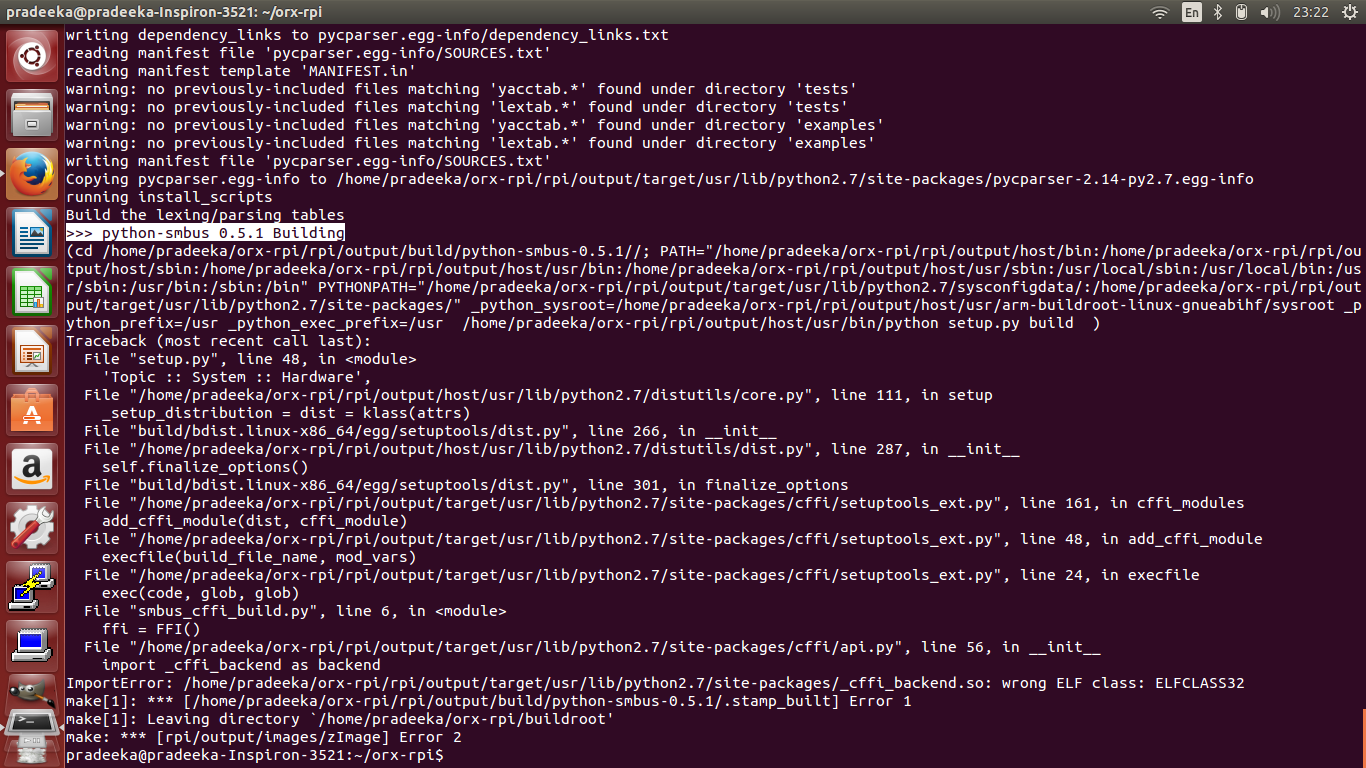
The $make B=rpi2 was successful and then I run the command $make image.
It stated and after about an hour I got the following error related to python-smbus.
I think this is related with the setup.py file in the smbus-cffi-0.5.1 package.
Probably the error is,
No local packages or download links found for cffi>=1.1.0
This is the content of the setup.py
from setuptools import setup, find_packages

import os

base_dir = os.path.dirname(__file__)

about = {}
with open(os.path.join(base_dir, "smbus", "__about__.py")) as f:
    exec(f.read(), about)

readme = os.path.join(base_dir, 'README.rst')
with open(readme) as f:
        long_description = f.read()

CFFI_VERSION = '1.1.0'

setup(
    name=about['__title__'],
    version=about['__version__'],
    description=about['__summary__'],
    long_description=long_description,
    author=about['__author__'],
    author_email=about['__email__'],
    url=about['__uri__'],
    license=about['__license__'],
    packages=find_packages(exclude=["test*", "*test*"]),
    zip_safe=False,
    ext_package='smbus',
    install_requires=['cffi >= ' + CFFI_VERSION],
    setup_requires=['cffi >= ' + CFFI_VERSION],
    cffi_modules=["smbus_cffi_build.py:ffi"],

    classifiers=[
        'License :: OSI Approved :: GNU General Public License v2 (GPLv2)',
        'Development Status :: 5 - Production/Stable',
        'Intended Audience :: Developers',
        'Intended Audience :: End Users/Desktop',
        'Intended Audience :: System Administrators',
        'Operating System :: POSIX :: Linux',
        'Programming Language :: Python :: 2.6',
        'Programming Language :: Python :: 2.7',
        'Programming Language :: Python :: 3',
        'Programming Language :: Python :: 3.2',
        'Programming Language :: Python :: 3.3',
        'Programming Language :: Python :: 3.4',
        'Programming Language :: Python :: Implementation :: CPython',
        'Programming Language :: Python :: Implementation :: PyPy',
        'Topic :: System :: Hardware',
    ],
)
EDIT: According to the python-smbus-cffi: new package - Patchwork following line is missing in my .mk file
PYTHON_SMBUS_CFFI_DEPENDENCIES = host-python-cffi
You probably want this as well:
EDIT:
As a general recommendation, look into setting up a virtualenv, and installing wanted packages into it using pip. Then you can find out what packages they pulled in as dependencies using pip freeze command.
I found a python-cffi package inside buildroot/package but the version is less than 1.1.0.
################################################################################
#
# python-cffi
#
################################################################################

PYTHON_CFFI_VERSION = 0.8.6
PYTHON_CFFI_SOURCE = cffi-$(PYTHON_CFFI_VERSION).tar.gz
PYTHON_CFFI_SITE = https://pypi.python.org/packages/source/c/cffi
PYTHON_CFFI_SETUP_TYPE = setuptools
PYTHON_CFFI_DEPENDENCIES = host-pkgconf libffi
PYTHON_CFFI_LICENSE = MIT
PYTHON_CFFI_LICENSE_FILES = LICENSE

$(eval $(python-package))
Can I update this to the latest version of cffi-1.5.0 by replacing the version number and replacing the md5 in .hash file? If so how to calculate the sha256 based on md5.
# From https://pypi.python.org/pypi/cffi/0.8.6
md5    474b5a68299a6f05009171de1dc91be6    cffi-0.8.6.tar.gz
# Calculated based on the hash above
sha256    2532d9e3af9e3c6d0f710fc98b0295b563c7f39cfd97dd2242bd36fbf4900610    cffi-0.8.6.tar.gz
Else, shall I create a new folder for version 1.5.0 in rpi/package directory?
You can do it either way, but you don’t need to update it unless one of your packages specifically requires a newer version.
Actually it is looking for cffi>=1.1.0
In that case, this is the simplest solution:
cd buildroot
git fetch
git checkout 7d48f7d77429ad4586674d224fc3168202ad4a40 package/python-cffi/
This will check out only the python-cffi package from the 7d48f7 commit, which is the lastest development version of buildroot. That gives you 1.5.0 version of the package.